Indulgent Chocolate Chip Cannoli Pie
Hey there, fellow food lovers! Today, I’m thrilled to introduce you to a dessert that truly embodies love and indulgence: Chocolate Chip Cannoli Pie. As a kid, I remember the excitement of family gatherings where sweets ruled the table. Everyone would gather around, sharing stories and laughter, while plates piled high with desserts beckoned us. The warm, inviting aroma of baked goods filled the air, creating a cozy atmosphere that made my heart swell. This Chocolate Chip Cannoli Pie captures that feeling perfectly! It’s creamy, crunchy, and downright delicious.
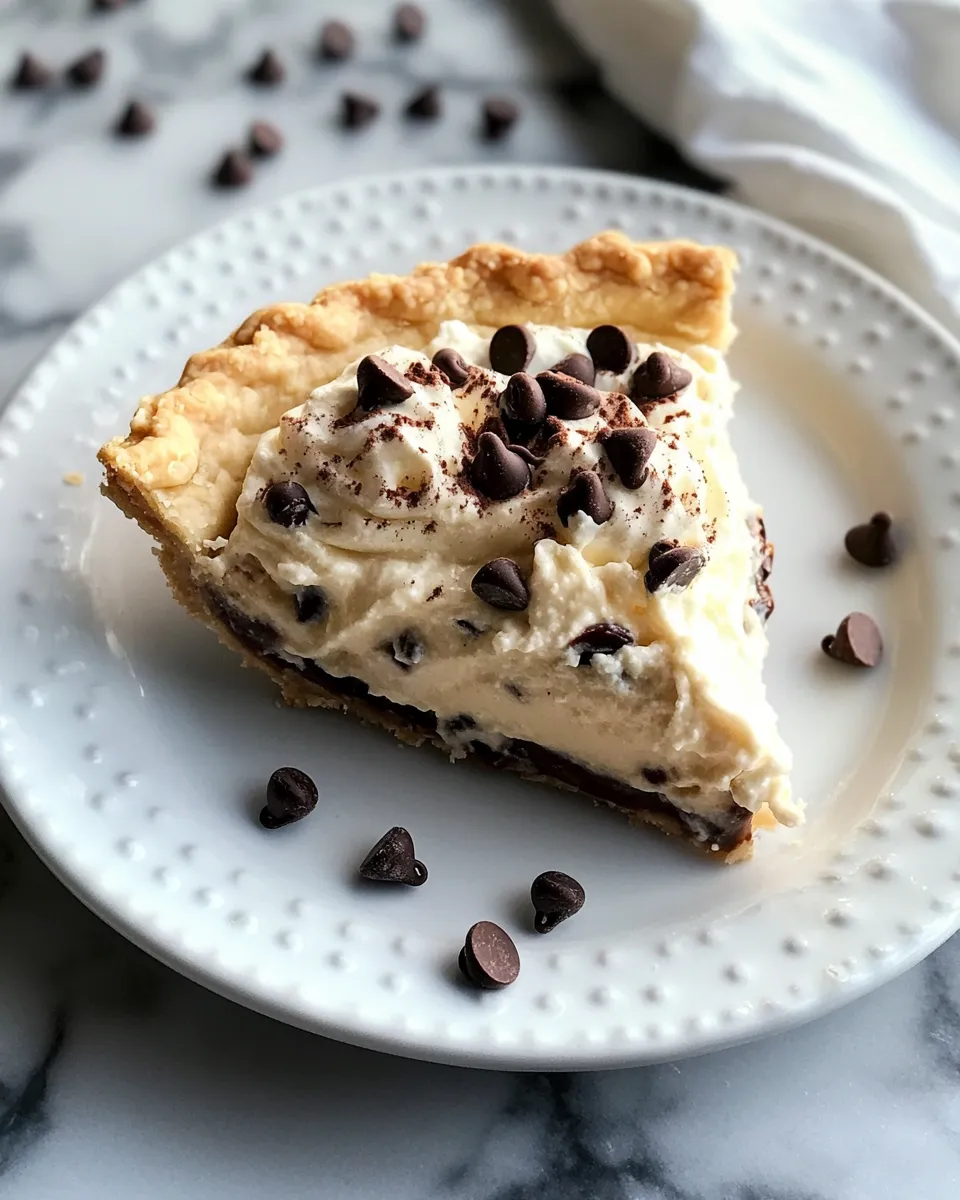
This pie is not just a treat; it’s an experience. Imagine biting into a crisp crust, filled with a luscious, sweet ricotta filling, and studded with chocolate chips. It’s like a cannoli but in pie form—how fabulous is that? Whether you’re celebrating a special occasion or simply looking to satisfy your sweet tooth, this recipe is sure to impress. So, let’s roll up our sleeves and get started on this decadent delight!
Why You’ll Love This Recipe
1. Simple and Quick to Make
Who says indulgence has to be complicated? With just a handful of ingredients and straightforward steps, this Chocolate Chip Cannoli Pie can be whipped up in no time. It’s perfect for busy bakers who want to impress without spending hours in the kitchen!
2. Versatile and Customizable
This recipe is a blank canvas! Feel free to get creative with your favorite flavors. Whether you prefer a hint of vanilla, a splash of almond extract, or even some citrus zest, you can make this pie uniquely yours. Plus, you can swap out chocolate chips for fruit or nuts!
3. Perfect for Any Occasion
From birthdays to holidays or simply a Tuesday night, this pie fits right in. It’s your go-to dessert for potlucks, family gatherings, or a cozy night in. Everyone will want a slice—and you might want seconds!
4. Crowd-Pleasing Flavor
Rich, creamy, and sweet, this pie checks all the boxes for dessert lovers. The combination of the crunchy crust and creamy filling is heavenly, and the chocolate chips add just the right amount of sweetness. Trust me, once you take a bite, you’ll be hooked!
Ingredients
Before we begin, gather your ingredients. Make sure everything is fresh for the best results!
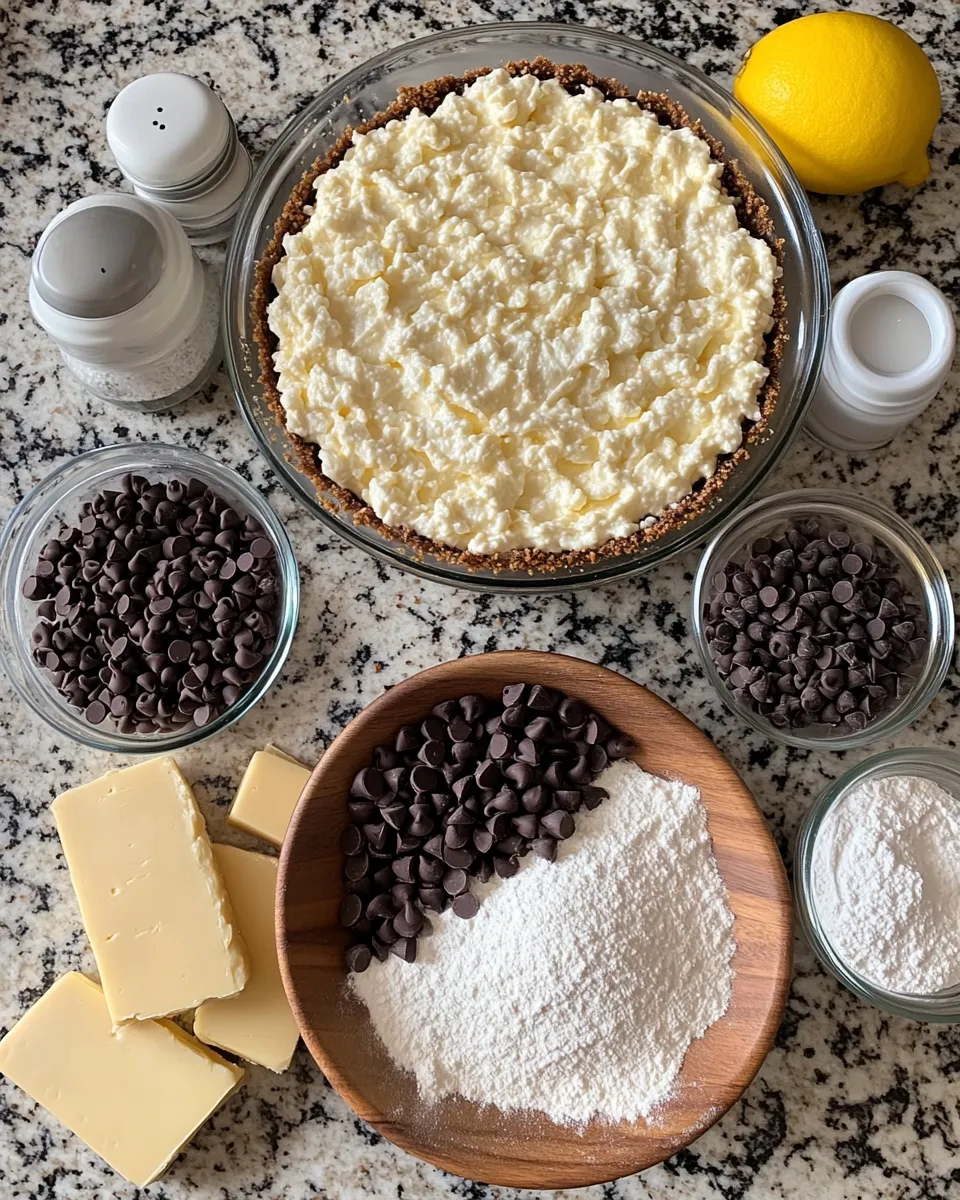
Full List of Ingredients
- 1 pre-made pie crust (store-bought or homemade)
- 15 ounces ricotta cheese
- 1 cup powdered sugar
- 1 teaspoon vanilla extract
- 1/2 cup mini chocolate chips
- 1/4 cup heavy cream
- 1/4 cup chopped pistachios (optional, for garnish)
- Chocolate shavings or cocoa powder (for garnish)
Step-by-Step Instructions
Step 1: Prepare the Pie Crust
Start by preheating your oven to 350°F (175°C). If you’re using a store-bought pie crust, simply follow the package instructions for pre-baking. If you’re feeling adventurous and opting for homemade, roll it out to fit your pie dish. Make sure to poke holes in the bottom with a fork—this prevents bubbling. Bake the crust for about 10-12 minutes, or until golden brown. The aroma will fill your kitchen, making it hard to resist sneaking a piece!
Step 2: Mix the Ricotta Filling
While your crust is cooling, it’s time to prepare the filling. In a large mixing bowl, combine 15 ounces of ricotta cheese and 1 cup of powdered sugar. Use a hand mixer or whisk to blend until smooth and creamy. This step is crucial because it ensures there are no lumps in your filling. Add in 1 teaspoon of vanilla extract and mix until fully incorporated. You’ll love the sweet, fragrant aroma that fills the air!
Step 3: Fold in the Chocolate Chips
Now comes the fun part—chocolate! Gently fold in 1/2 cup of mini chocolate chips into the ricotta mixture using a spatula. Make sure the chips are evenly distributed, as every bite should have that delightful chocolatey goodness. This step adds a wonderful texture and flavor contrast to your creamy filling.
Step 4: Whip the Heavy Cream
In a separate bowl, pour in 1/4 cup of heavy cream. Using a hand mixer, whip the cream until soft peaks form. This typically takes about 2-3 minutes. Soft peaks mean that when you lift the beaters, the cream holds its shape but still has a soft, billowy texture. This step adds lightness to your filling, making it even more delightful!
Step 5: Combine the Mixtures
Gently fold the whipped cream into the ricotta mixture until fully combined. Be careful not to overmix; you want to maintain that airy texture. The lightness of the whipped cream combined with the rich ricotta will create a filling that’s both creamy and fluffy. It’s a beautiful balance!
Step 6: Fill the Pie Crust
Now that your filling is ready, it’s time to assemble! Pour the ricotta mixture into your cooled pie crust. Use a spatula to smooth the top, making sure it’s nice and even. You want it to look as good as it tastes! Once filled, cover the pie with plastic wrap and refrigerate it for at least 2 hours. This helps the flavors meld together beautifully.
Step 7: Garnish and Serve
Just before serving, remove the pie from the fridge and add your desired toppings. Sprinkle chopped pistachios on top for a pop of color and flavor. You can also add chocolate shavings or a dusting of cocoa powder to give it that extra flair. Slice into wedges, and watch as everyone’s eyes light up. The anticipation is palpable!
What to Serve with This Recipe
Suggested Pairings
This Chocolate Chip Cannoli Pie is delightful on its own, but why not elevate the experience? Serve it alongside a scoop of vanilla ice cream or a dollop of freshly whipped cream. A side of fresh berries can also add a refreshing contrast to the richness of the pie. You could even drizzle some chocolate or caramel sauce over the top for an extra layer of indulgence!
Variations and Substitutions
1. Flavor Variations
Feeling adventurous? Experiment with flavors! Add a teaspoon of almond extract for a nutty twist, or fold in some orange zest for a citrusy kick. You could even swap out the chocolate chips for dried fruit like cranberries or cherries for a unique flavor profile.
2. Gluten-Free Option
If you’re gluten-sensitive, don’t worry! You can easily make a gluten-free version by using a gluten-free pie crust. There are plenty of delicious pre-made options available, or you can make your own from almond flour or gluten-free flour blends.
3. Dairy-Free Alternative
For those avoiding dairy, substitute the ricotta cheese with a dairy-free cream cheese or a blended silken tofu. Just add a bit of sweetener and vanilla extract to mimic the flavor. The heavy cream can be replaced with coconut cream for that rich, creamy texture.
4. Mini Cannoli Pies
Want to make individual servings? Use a muffin tin to create mini pies! Simply cut small circles from the pie crust and press them into the muffin cups. Fill each cup with the ricotta mixture and bake for a shorter time. These bite-sized delights are perfect for parties!
Storage Instructions
Refrigeration
This Chocolate Chip Cannoli Pie can be stored in the refrigerator for up to 3 days. Just make sure to cover it well with plastic wrap or store it in an airtight container to keep it fresh. The flavors will continue to meld, making it even more delicious!
Freezing
If you want to make this dessert ahead of time, consider freezing it. Wrap the pie tightly in plastic wrap and aluminum foil. It can be frozen for up to 2 months. When ready to enjoy, let it thaw in the refrigerator overnight before serving.
Recipe Tips and Tricks
Related Recipes
If you love this Chocolate Chip Cannoli Pie, you might also enjoy my other recipes like the classic Tiramisu, the luscious Lemon Tart, or the rich Chocolate Lava Cake. Each of these desserts brings a unique flair to your table and is sure to delight your taste buds!
Print
Indulgent Chocolate Chip Cannoli Pie: A Decadent Delight
A delightful ricotta pie with mini chocolate chips, perfect for any occasion.
- Total Time: 2 hours 32 minutes
- Yield: 8 servings 1x
Ingredients
- 1 pre-made pie crust (store-bought or homemade)
- 15 ounces ricotta cheese
- 1 cup powdered sugar
- 1 teaspoon vanilla extract
- 1/2 cup mini chocolate chips
- 1/4 cup heavy cream
- 1/4 cup chopped pistachios (optional, for garnish)
- Chocolate shavings or cocoa powder (for garnish)
Instructions
- Preheat oven to 350°F (175°C) and bake the pie crust for 10-12 minutes until golden brown.
- Mix ricotta cheese and powdered sugar until smooth, then add vanilla extract.
- Fold in mini chocolate chips into the ricotta mixture.
- Whip heavy cream until soft peaks form.
- Fold the whipped cream into the ricotta mixture until combined.
- Pour the filling into the cooled pie crust, smooth the top, and refrigerate for at least 2 hours.
- Garnish with chopped pistachios, chocolate shavings, or cocoa powder before serving.
Notes
- For best texture, use fresh ricotta cheese.
- Chill the pie for longer if possible to enhance flavors.
- Prep Time: 20 minutes
- Cook Time: 12 minutes
- Category: Dessert
- Method: Baking
- Cuisine: Italian
- Diet: Vegetarian
Nutrition
- Serving Size: 1 slice
- Calories: 250
- Sugar: 18g
- Sodium: 150mg
- Fat: 14g
- Saturated Fat: 8g
- Unsaturated Fat: 6g
- Trans Fat: 0g
- Carbohydrates: 28g
- Fiber: 1g
- Protein: 6g
- Cholesterol: 30mg
Keywords: ricotta pie, chocolate chip pie, dessert recipe, easy pie recipe
FAQs
1. Can I use a different type of cheese?
Absolutely! While ricotta is traditional, you can use mascarpone for a creamier texture or even a dairy-free cream cheese for a vegan option.
2. How can I tell when the pie is set?
The filling should feel firm to the touch and hold its shape when sliced. Refrigerating it helps it to set properly.
3. Can I make this pie ahead of time?
Yes! This pie is perfect for making in advance. Just store it in the fridge until you’re ready to serve.
4. What if I don’t have mini chocolate chips?
You can use regular chocolate chips, but make sure to chop them into smaller pieces for even distribution in the filling.
5. Can I add fruit to the filling?
Of course! Adding fresh strawberries or raspberries can enhance the flavor and add a lovely color contrast. Just make sure to adjust the sweetness accordingly.
6. How do I prevent the crust from burning?
Cover the edges of the crust with foil if they start to brown too quickly during baking. This will protect the crust while the filling sets.
7. What’s the best way to serve this pie?
Serve it chilled with whipped cream or a scoop of ice cream. Garnishing with fresh fruit or nuts adds a nice touch!
Conclusion
And there you have it—your very own Chocolate Chip Cannoli Pie! This dessert is not just a treat; it’s a celebration of flavors that will transport you back to those warm, joyous family gatherings. With its creamy filling and crunchy crust, it’s bound to become a favorite in your home. Don’t forget to share your creations with friends and family—you’ll be making memories just like I did! Happy baking, and remember: cooking is love made visible!